Writing a Blog Post:
You can of course do all this using your own programs and techniques.
Part 1 - Write in Word:
Write the Post out in a Basic Text Editor (e.g NotePad) and save it.
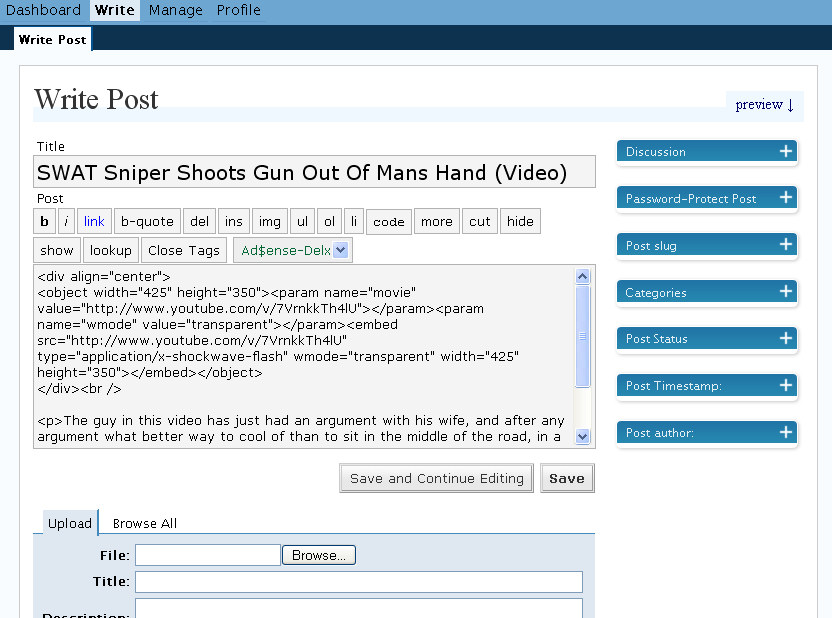
Title: SWAT Sniper Shoots Gun Out Of Mans Hand (Video)
Video: http://www.youtube.com/watch?v=7VrnkkTh4lU
The guy in this video has just had an argument with his wife, and after any argument what better way to cool of than to sit in the middle of the road, in a garden chair, holding a gun and threatening to shoot yourself.
This guy has his gun in his hand between his legs and suddenly, out of nowhere, has it shot out away from him from by a SWAT Sniper!
Part 2: Write in HTML
Add HTML Styling To the post
(you may prefer to use a HTML editor to do this part if you prefer).
Notes:
- You don't need the title within the HTML post as that is copied over seperately in wordpress(you'll see later).
- Copy The Embed Code from the Video Sharing Site
- Add <div align="center"> at the beginning and </div> at the end of the video embed code so that the video is centered.
- Make sure each paragraph is only 2-4 lines long when you preview the article.
- If you need small text use <p class="small">Text</p>
- Use <h3>Text</h3> or <h4>Text</h4> for sub headings.
- You can add a link now using the HTML code: <a href="http://www.the-website-i-link-to">Link Text</a> Or you can wait until you go into wordpress to add links.
- Always make sure the width value is 425 or lower. Change it if neccesary
<div class="aligncenter">
<object width="425" height="350"><param name="movie" value="http://www.youtube.com/v/7VrnkkTh4lU"></param><param name="wmode" value="transparent"></param><embed src="http://www.youtube.com/v/7VrnkkTh4lU" type="application/x-shockwave-flash" wmode="transparent" width="425" height="350"></embed></object>
</div>
The guy in this video has just had an argument with his wife, and after any argument what better way to cool of than to sit in the middle of the road, in a garden chair, holding a gun and threatening to shoot yourself.
This guy has his gun in his hand between his legs and suddenly, out of nowhere, has it shot out away from him by a SWAT Sniper!
Part 3: Copying To Wordpress
Copy the text directly into wordpress
- Log into wordpress: http://www.webtvhub.com/wp-admin/
- Click on the "Write" Tab at the top
- At any point you can click save and continue and scroll down the page to preview what the post will look like.
- Once finished you can click Save
Part 4: Preparing The Post for Publishing
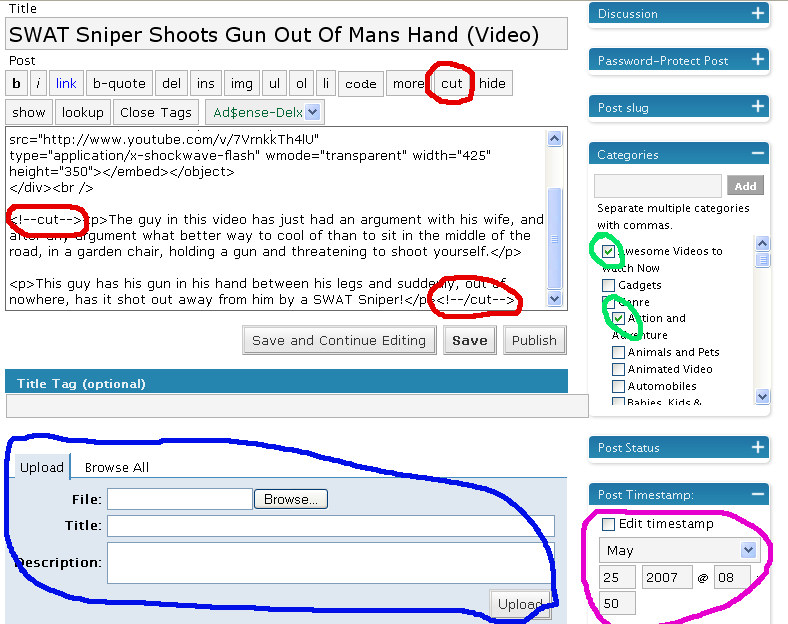
- Categories (green):
Add the post into the relevant categories. If you are posting a video you would always select
- the Awesome Videos to Watch Now category,
- the relevant genre categories (in this case action and adventure),
- always the news category (as this is default),
- and any other relevant categories (video on demand is relevant in this Swat Sniper example).
- If you wand a category to be added contact the lead editor. - Cutting - UPDATED:
If the post is long (more than 2-3 paragraphs) then use the 'more' function. This prevents the full post being shown on the front page.
This was previously done using the 'cut' tags shown in red in the image below but this is no longer used.You simply add the Cut tages at the start of the text you want to "cut" from the home page and again at the end of the post. You can do this using the Cut button.
Just click the 'insert more tag' button (left of spell checker button in visual view, or simply 'more' button in HTML view) at the point you want to insert the continue reading link. No need to insert it again at the end - just in the place you want the 'continue reading' link to go. - Scheduling (pink/purple):
- You usually don't need to schedule a post -- but if you do check the edit timestamp button and schedule it for a future date. This is usually done if we have too many posts on any given day. - Images (blue):
- Should you want to place an image use this box. Images should be under 410 in width and be a compressed Jpeg or Gif.
- Add <img align="right"/> to the image tag to align it to the right (for smaller images). If you want to center it use <div class="aligncenter"><img /></div> - Preview:
Before finishing proof read your article one last time using the preview section as you scroll down the editing page. Read it to yourself out loud as this will make it easier to pick up on any mistakes. Also check that the layout is correct.
Once Done click save and email the editor to say you have something ready to be approved
christew (at) webtvwire.com