Inserting an Image:
In certain posts you will need to insert an image. If you do not have image editing software then you will need to download:
- PhotoPlus - For resizing images and saving images as compressed Jpeg and Gifs.
- ScreenGrab Pro - For capturing images from web-pages
Finding an Image
1. Look for a company logo or image in Google Image Search:
Example Search
Note: Many of the images here are copyright, you are fine to use logos or other non-copyrighted images, but do not use images that may be copyright.
2. Look for a free picture in Every Stock Photo
Example Search
These images are not copyrighted and are free to use
3. If you see an image on a page you want to use you can often just right click and then click "save image as". If you can't directly save an image try option 4:
4. Take a screengrab of something from another website using ScreenGrabPro
Instructions for ScreenGrab:
- Download and Install.
- Run ScreenGrab
- Open up the Window that has an image you want to copy. For example you could copy the logo in the top-left of this page.
- Click "Grab Region" or Press F8
- Hold down the left mouse button and drag over the area you want to copy.
- Go back to ScreenGrab and click file > save to jpeg as.
Resizing and Compressing Images
If your image is to wide, or the file size is very big you will need to use PhotoPlus.
- Download and Install.
- Run PhotoPlus
- Open the Image you want to use.
- To Resize click on image > image resize.
The largest an image should be is 420 pixels wide, however you may sometimes want to make an image smaller than this. If an image is already small you do not need to resize it. It is generally a bad idea to try and make an image bigger. - To Save and Compress. When you are done you need to save your file and make sure it is compressed so the file size is not too big.
a) Click File > Export Optimizer.
b) Select Jpeg from the drop down menu.
c) Move the slider scale to about 60% making sure the image quality does not degrade too much. If the quality degrades then move the slider to 70-80%.
The file size should usually be less than 30kb, and usually around 10-20kb for a 400 pixel image.
d) Click Export and save your file.
IMPORTANT
ALWAYS NAME OR RENAME YOUR FILE TO A KEYWORD THAT DESCRIBES THE VIDEO.
If it is a YouTube logo rename it to youtube-logo. If it is a picture of a dog rename it to dog-picture. Always use a - between words like: melted-snowman-in-alaska
Inserting your Image in Wordpress
Now that you image is ready you can insert it into wordpress.
- Click on Browse in the Upload Image Box and select the image from your computer.
Make sure you also type in a Title. This should just be a word or two describing the picture. e.g YouTube Logo 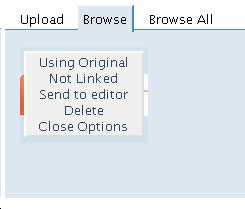 Now a thumbnail of your image should appear. Click this thumbnail and an options box should come up (picture right).
a) If you click the first option it will switch between "using original" and "using thumbnail". Make sure that the words "Using Original" are displayed.
b) The second option will either say "linked to page", "linked to image" or "not linked". Make sure it says "Not Linked"- Once you have done this your image is ready to be put into your article.
For larger images: 300 pixels wide or more.
a) Write the following code where you want your picture to go:
<div align="center"></div>
This will ensure your picture is centered.
b) Click your cursor between the <div align="center"> and </div> tags as if you are ready to write something between those tags.
c) Now click "send to editor" on your image options box.
This should insert your image between the div tags like this:

After clicking "Save and Continue" you can preview it and will see the centered image in your article.
For Smaller Images (less than 300 pixels wide).
a) You will always align smaller images to the right. Simple click your cursor after a <p> tag as if you are about to start writing after that <p> tag.
b) Now click "Send to Editor" and the image code will appear next to your <p> tag.
c) You need to then tell the image it will be aligned to the right.
You will see some code like this: <img id="image350"
Add align="right" as follows:
<img align="right" id="image350"
It should look something like this:

After clicking "Save and Continue" you can preview it and will see the centered image in your article.
It should look something like this: